Tom’s Tech Tip: Customize Your Quick Access Toolbar
As Certified Legal Nurse Consultants, you live in a Microsoft® Word world. I do too. Over the years, I’ve learned that Word can make your life easy if you let it. One way to make it easy is to customize and utilize the Quick Access toolbar that was first introduced with the 2007 version (Yes, it’s been seven years. It’s time to upgrade from Office 2003!).
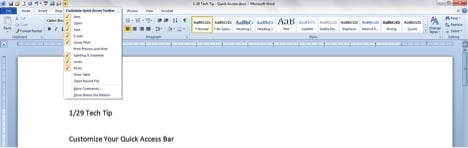
If you haven’t used the Quick Access toolbar, you can find it located at either the top left of your Word screen (next to the little “W” icon above the “File” tab) or below your “Ribbon” (look below the “Clipboard” on the “Home” tab). It’s a customizable menu that allows you quick access to some of the commands or tools you use the most in Word. I customized mine to include commands for save, create new file, redo and undo plus spell Czech (just kidding), print and attach to email. Do I use them all? Not in every document, but I use them enough (especially undo) to want to have them at my fingertips and I’m sure that my CLNC® amigos feel the same way. In other words, we don’t have to fish through a bevy of ribbon choices, drop-down menus and whatnots to find a command we need (Did you know spell checque is actually on the “Review” tab? Go figure!).
Once you’ve found your Quick Access toolbar, now it’s time to customize it because one-size doesn’t fit all (look at your brother-in-law if you don’t believe me). There’s a trick to customizing the Quick Access toolbar though. That trick is knowing that the icons or shortcuts will go onto the toolbar in the order that you add them. This means that if you decide you want to add a new “short cut” you’ll either have it in a place you don’t want it to be, or you’ll need to start over and empty, then start over each time.
So, here’s my recommended list of shortcuts (in order):
Save file
Open file
New document
Redo
Undo
Spelling and grammar
Quick print
Email
The fastest and easiest way to customize your Quick Access toolbar for your legal nurse consulting documents is to simply click on the down arrow next to the “W” icon then select, or deselect, the shortcuts you want (in order) from the list that presents itself. If you change your mind later you can add or remove shortcuts using this same method.
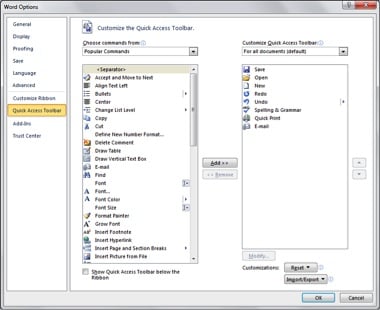
The expert Certified Legal Nurse Consultant and reader of these Tech Tips will prefer to take the long, learning route to customization (We’re all up for the occasional challenge, right?). To take that long road, first click on “File,” “Options” and “Quick Access Toolbar” and from there simply select a shortcut and click on “Add” to put it on your toolbar and click “OK” when you’re done!
Whichever way you choose to customize your toolbar, when you’re done, your CLNC work product will practically write itself! Here’s the beauty part – the Quick Access toolbar is in all the Office® products so once you’ve customized the first one, the rest are easy.
LegalNurse.com is accredited as a provider of nursing continuing professional development by the American Nurses Credentialing Center’s Commission on Accreditation.
The National Alliance of Certified Legal Nurse Consultants (NACLNC®) is the largest and oldest association of legal nurse consultants.
Need tuition assistance? We've partnered with Sallie Mae to provide financing options.
*The opinions and statements made by Vickie Milazzo, the founder of Medical-Legal Consulting Institute, Inc. are based on her experiences and expertise, should not be applied beyond the specific context provided, and do not guaranty or project actual results. Vickie Milazzo is no longer involved in the operations or management of the business, but is involved as an independent education consultant.

 Keep on Techin’,